
This is a followup tutorial in the “Making a Discord Bot with Godot series“. Make sure to read Part One and Part Two first!
Come on… just… five more minutes. Huh? The readers are back? But I’m still sleepy! Weren’t two parts enough for them? Ugh fine fine, I’ll write more. Pff, I hope you are happy, readers. Welcome back for Part Three, where we will make our bot come out of its shell and actually talk to people! I should do the same with my own self. Anyway let’s begin, I wanna go back to bed soon. yawn
So yeah, we’re gonna start by learning how to send messages. (Finally! It took two goddamn parts to get to this point. Seriously, Overloaded?) We want to make sure our bot… Um, I think it’s time to give it a name, shall we? Godot Bot? Gobot? Gobot it is! So, we want to make sure that Gobot is polite and it should welcome new members when they join our server. Remember that first thing we did at Part One? With the request we made to a URL to get data for our client user? Turns out it wasn’t pointless after all, because all we’re going to do today is HTTP Requests!
First things first, inside our event handler method (I call is handle_events() if you recall), we’ll check if the Event’s name is “GUILD_MEMBER_ADD“. This event occurs every time a new member joins one of our servers. Also, we’re going to refer to servers as “guilds” from now on. Inside this event, we’re gonna store some stuff, starting from the guild’s ID. Then, we’ll make a new PoolStringArray called headers, where we will store “Authorization: Bot (YourTokenHere)” for now. Then, we’ll make a GET request from https://discordapp.com/api/guilds/{guild.id}/channels in order to get all the channels of the guild. If you recall, when the request is complete, it will trigger the “request_completed” signal. You don’t need to connect it to any method this time. What we have to do it to tell Gobot to wait until the request is complete before doing anything else inside handle_events(). In other languages like Python, we use “await” to, well, await the completion of async methods. That is Python’s way to define coroutines. GDScript doesn’t have async and await, but fear not! It still supports coroutines, using “yield“. So, we are going to do yield(self, "request_completed") in order to wait until the signal is triggered, and we’re gonna store the result in new a variable called data_received. In other words, we’ll just write var data_received = yield(self, "request_completed"). Actually, data_received is not going to be a variable, but an array containing the result (an integer), the response code (integer, again), a PoolStringArray of headers and a PoolByteArray containing the body. More info on Godot’s Docs. We only need the body. So, we’ll make a variable (which will actually be a Dictionary) called channels, which is just data_received[3] (the body) converted to string (get_string_from_utf8()), then to JSONParseResult (JSON.parse()) and then to a Dictionary (JSON.parse().result). After that we’ll make an empty variable for the channel id. We need the channel id so Gobot can know in which channel to send its heartwarming welcome message. We’re going to loop through all the guild’s channels and the first text channel we find, we’ll store its id so we can send our message there. Please note that this is not the best idea, because Gobot may not have permission to talk to the first text channel it finds. But we’ll do it that way, for the sake of simplicity. To see if a channel is a text channel, we must check if its “type” is equal to 0. See Discord’s Docs for the other types.
We managed to get the id of the guild’s first text channel. Now we’ll actually send the damned welcome message! It is considered polite to call others by their names, and we want Gobot to be polite, so we’ll have it store the new member’s username by writing var username = dict["d"]["user"]["username"]. The message will be “Welcome (UsernameHere)!”. We’re going to need a small Dictionary for that with “content” as it’s only key, and with the value of the message we want to send. So, it will be var message_to_send := {"content" : "Welcome %s!" % username}. We need to convert our Dictionary to a string, so we’ll JSON.print() it and store it in a variable called query. In order to send the query, we’ll do another HTTPRequest.request(), but this time it will be a POST request instead of a GET request, because we will send stuff instead of receiving. This requires one more header which specifies the type of our content, which is of course application/json. We’ll append it to our headers PoolStringArray like this headers.append("Content-Type: application/json") and FINALLY we’re ready to make the request! The URL we’re going to use is https://discordapp.com/api/v6/channels/{channel.id}/messages. Obviously we also have to send our headers, our query and we need to tell it that it’s going to be a POST request. request("https://discordapp.com/api/v6/channels/%s/messages" % channel_id, headers, true, HTTPClient.METHOD_POST, query). Please note that this only works because the script is extending from HTTPRequest. If it’s not, you’re going to need an HTTPRequest node for it to work. That’s… that’s too much text. How about a screenshot?
 Ah! This looks much better than all that text! Make sure your script either extends from HTTPRequest, or you’re using an HTTPRequest node to do all these requests.
Before we continue, let’s actually see Gobot in action! You know, to see if it works. Definitely not to scream of joy because our baby is actually functional.
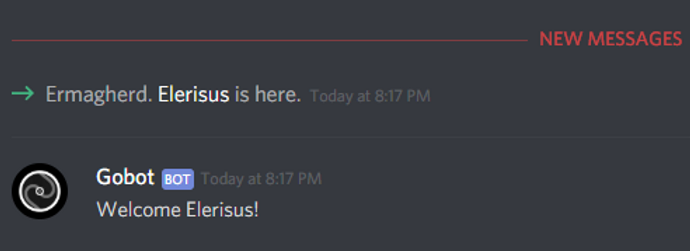 Seems like Gobot is working fine! WOOHOO!
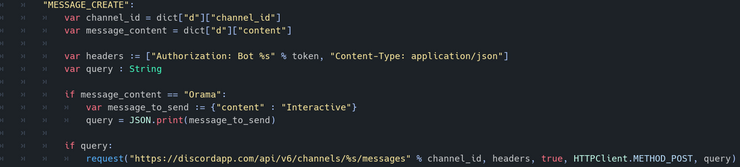
Next up is checking if a certain message has been send, and then responding to it. This is a surprisingly easy part, because we don’t need to do any GET requests to get extra data, we only need to do the final POST request to send our message. So, if the event name is equal to “MESSAGE_CREATE“, we save the ID of the channel the message was being send in (dict["d"]["channel_id"]), as well as the message’s content (dict["d"]["content"]). Then, we set our headers to be the same as we set them before, the authorization header and the content-type header. We’ll also set an empty string variable called query. We will send a message only if query is NOT empty. Now, we’ll check if the message’s content is equal to the value we want. Let’s say for instance that, when someone says “Orama”, Gobot has to reply with “Interactive”. (Shameless advertising time, make sure to check out our game development team, Orama Interactive!) Pretty straightforward, right? So, we’ll check if the message’s content is equal to “Orama” and, if it is, we’ll make a new Dictionary message_to_send, with “content” key being equal to “Interactive” value, and we’ll set our query to JSON.print(message_to_send). Then, if query is NOT empty, we send the request. The URL we’re going to use is obviously the same as the one we used before, and so are the rest of the parameters. Screenshot time? Screenshot time.
 Finally the juicy part, am I right?
 Like father like bot.
If you want, you can obviously extend it by adding more checks for even more messages, you can make the checks be case insensitive by using message_content.to_upper() and a ton of other stuff. But I’m going to end the tutorial here. I don’t know if there will be a next part, because I’m still currently learning and I have to figure out a lot of things, while at the same time being busy developing games at Orama Interactive. So make sure to follow the blog to receive news and updates for possible future parts, or entirely new blog posts! This “Making a Discord Bot with Godot” tutorial series has been a blast and a huge learning experience for me, and I hope it has been for you, too! So, here’s the pastebin code for this part and, as promised, the long awaited GitHub repository! Now, it’s time for me to head back to bed. Thank you so much for your time, and I hope I’ll see you in future blog posts! Take care!