
This tutorial uses Godot Engine 3.1 (but it should be working with newer versions too), as well as its GDScript language. In this part we will cover basic connection with Discord API’s Gateway, identifying our clients and sending and receiving heartbeats! Exciting enough? Let’s start!
Once upon a time, I woke up and I had nothing to do. Well, actually, I had stuff to do, but I was procrastinating. And as every professional developer does, I thought of starting a new pet project/experiment. A new Discord bot made entirely with Godot, using GDScript. I already had made another Discord bot in Python using the discord.py library, so I did have some experience on Discord bot making (and the rest of my server’s members hated me for it)
The issue here is that there is no Discord library for GDScript, so at first I approached it a bit differently. I generated a python script, and run it within Godot using OS.execute. The way to do it is pretty simple, you just tell OS.execute to, well… execute python from a script, exactly as you would from the system’s shell. It looks like this: OS.execute("python", ["filepathhere.py"], false). And it actually works! But eventually, I run to some limitations. I didn’t know, for instance, how to capture output and print text received from the bot, on my Godot scene. Some things weren’t working at all, like sending files. So I started wondering if it was possible to communicate with the Discord API directly with GDScript, without relying on another language and library. And because I was too lazy to do any actual work, I started experimenting! Keep in mind that, obviously, this isn’t the ideal way to make a bot and that you should use a library instead, mostly to save yourselves some headaches. But I guess you wanna do it the hard way like me, huh? Let’s start then!
Now, keep in mind that I’m not what you call an “expert” in networking. And boy, did I have a hard time figuring out what to do. My first move was to make a new HTTPRequest node and make a request at https://discordapp.com/api/users/@me. I connected the request_completed() signal to my script. When the signal gets fired, the connected function prints out the body. Obviously, I got the same result as you would get if you clicked on that link and have it opened in your browser – {"code": 0, "message": "401: Unauthorized"}. I needed to authorize my bot somehow, and this is where the bot token comes in. At this point I will assume you have some experience with Discord’s developer portal and you know what tokens are and that they are used for authorization. You can’t have a bot without a token, which you can find if you make a new application here.
In order to authorize the bot, you need to pass the token as a header, in the form of a PoolStringArray, but with only one element because, well, we only need to pass the token right now and nothing else. The bot token authorization header is in this format: Authorization: Bot (token) So far our code should look like this:

Now now, I can hear you complaining from miles away. I’m going to put the code in a public github repository, so don’t worry about being unable to copy and paste from a screenshot.
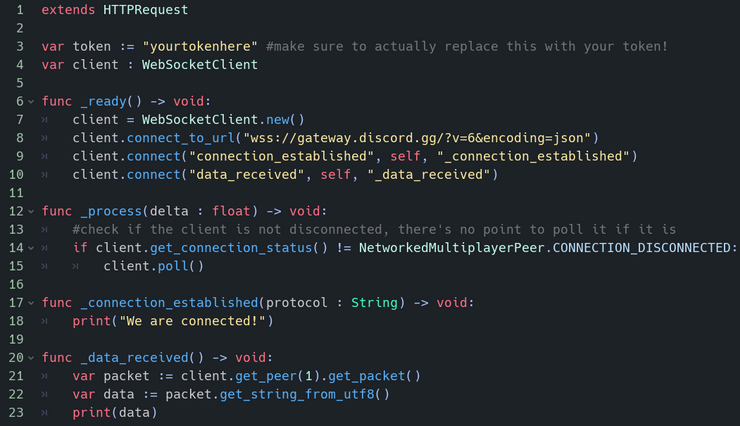
And, if you actually put a valid token in there, you would see that it prints a valid result this time. But that’s boring! We wanna do stuff with the bot, interact with it, not just print data. We need to go deeper (yes, there will be meme references). This is why our next step will be to connect to Discord’s Gateway API, which we will do using Godot’s WebSocketClient. So, feel free to remove the previous code, make a new WebSocketClient, and have it connect to wss://gateway.discord.gg/. Generally, it is a good idea to explicitly pass the gateway version and encoding. For example, we may connect to wss://gateway.discord.gg/?v=6&encoding=json. For more information on that, make sure to read the official Discord Developer Docs.
Now that we started the client by connecting it to the gateway’s URL, if we read the documentation on WebSocketClient, then we know that we also have to poll our client at regular intervals. We’ll poll it inside our _process() method. Next, we will connect the client’s connection_established signal to a new method and inside that method, we’ll print that we have connected. For more information on WebSocketClient’s signals, read the docs I linked above. The code should look something like this:

Note that extending from HTTPRequest isn’t required here. This would also work if we extended from Node.
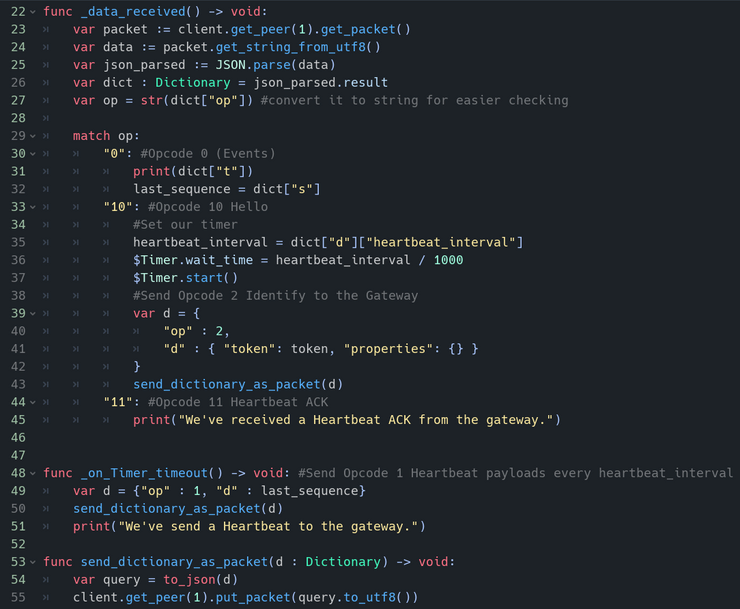
Now that we are connected to the gateway, we should immediately receive an Opcode 10 Hello JSON payload (more info on Discord Developer Docs). After that, the gateway expects us to send an Opcode 1 Heartbeat payload every heartbeat_interval milliseconds, which we get from the Hello payload. Every time we send an Opcode 1 Heartbeat, we receive an Opcode 11 Heartbeat ACK from the gateway. Heartbeats are being used so that the gateway can determine whether our client is still connected or not, because, if we disconnect, we stop sending heartbeats, so the gateway considers us dead – err, I mean, disconnected. The same goes for Heartbeat ACKs, but it’s vice versa. Along with the first Opcode 1 Heartbeat, we also must send an Opcode 2 Identify payload, with information such as our token, presence and other stuff you can find on the docs. After we do that, our client receives an Opcode 0 Dispatch payload. Opcode 0 Dispatch payloads are used for event handling, stuff like the client being ready, joining a guild (server), a message being send, and others. The first Event we will receive is the “Ready” event.
Imagine going to a VIP only party. The first thing that you see when you arrive are the guards (Discord’s Gateway). You go at the door (connect to the gateway), and the guards greet you (you receive an Opcode 10 Hello payload). Then, you are supposed to show your VIP pass (send your token with an Opcode 2 Identify payload). If the token is valid, you are granted entrance (Discord shows your bot as online). However, the party has some strict rules. You are supposed to be dancing all the time, otherwise the guards kick you out (client gets disconnected). So you need to show the guards that you dance every heartbeat_interval milliseconds (send an Opcode 1 Heartbeat), and every time they confirm that the party hasn’t ended (the gateway sends you an Opcode 11 Heartbeat ACK back). While you are partying, you are being notified of every new thing that’s happening (you receive an Opcode 0 Dispatch), like when you are ready to start partying (“Ready” event), when someone new joins the party “Guild Member Add” event), when someone is about to speak (“Typing Start” event), when someone says something (“Message Create” event), and many more. This is pretty much how the Discord API’s Gateway works. Now, let’s get back to coding, shall we?
We need a way to receive the data that the gateway sends us. First, let’s print the contents of the Opcode 10 Hello payload we will receive when we connect. To do that, we need to connect the WebSocketClient’s “data_received” signal to a new method. Inside that method, we will get the WebSocketClient’s WebSocketPeer with get_peer(1), and then we will get the peer’s packet. Which means we have to do this client.get_peer(1).get_packet(). For more information, refer to the Godot docs. I can’t explain everything! Now that we got our packet, we will get it in string format in order to print it. The code so far should look like this:
The output should be something like this:
We are connected! {"t":null,"s":null,"op":10,"d":{"heartbeat_interval":41250,"_trace":["[\"gateway-prd-main-gjhc\",{\"micros\":0.0}]"]}}
Now let’s make our data into a Dictionary, and save the op code and do a check if it is equal to 10. If it is, we save the heartbeat_interval. Make sure you set heartbeat_interval as a float variable on the top of your script! Because we have to do something every x seconds, we’ll use a Timer node, which will be a child of our current node. We’ll set the timer’s wait time to heartbeat_interval / 1000 (to convert milliseconds to seconds) and we’ll start it. We’ll also connect the Timer’s timeout signal to our script in a new method, and inside that method we’ll make a new dictionary that will contain this {"op" : 1, "d" : last_sequence}. The last sequence is a number we get from Opcode 0 events, so don’t worry about that right now. Just set it as a float variable at the top of your script and we’ll set a value for it soon. After all, we’ll get our Opcode 0 “Ready” event before we send our first Heartbeat. We’ll get the peer of the client once again and we’ll put the dictionary as a packet, by converting it to JSON and then to UTF-8. We can also print a message to the console, if we want.
Along with setting our timer, we will also send an Opcode 2 Identify payload when we receive the Opcode 10 Hello payload. Similar to how we did with our Opcode 1 Heartbeat code, we’ll make a new dictionary that will contain at least our op code (which is 2), our token, and an empty set of properties. You can add properties of course, as well as other stuff like presence, but I’ll leave that up to you. The only hint I’m going to give you is, read the Discord Developer Docs! Then we’ll send the data the same way we sent them with out Opcode 1 Heartbeat payload. In fact, I’ll create a method called send_dictionary_as_packet() for that, which you will see in the next screenshot.
After we have successfully identified ourselves, we should receive an Opcode 0 “Ready” event payload, and maybe some other “Guild Create” events, if our bot belongs to any servers. We will check if our op code is equal to 0, and inside we’ll print our event name and set last_sequence to the “s” field of our payload. Lastly, we’ll check if our op code is equal to 11 and we’ll simply print “We’ve received a Heartbeat ACK from the gateway.” to our console. The code should look something like this:
 Our two new variables, heartbeat_interval and last_sequence 🙂
 Anything before the
 _data_received() method hasn’t changed, apart from the 2 new variables.
Oof, and that’s it for Part One! This certainly took a long time, huh? In the next part, we’ll learn how to handle events, disconnecting, and then resuming our connection! Oh and, I lied about the github repository. Well, at least not before I’m done with these series of blog posts. However, because I’m such a nice person who loves his readers, here’s the code in pastebin: https://pastebin.com/qZPrqFMc